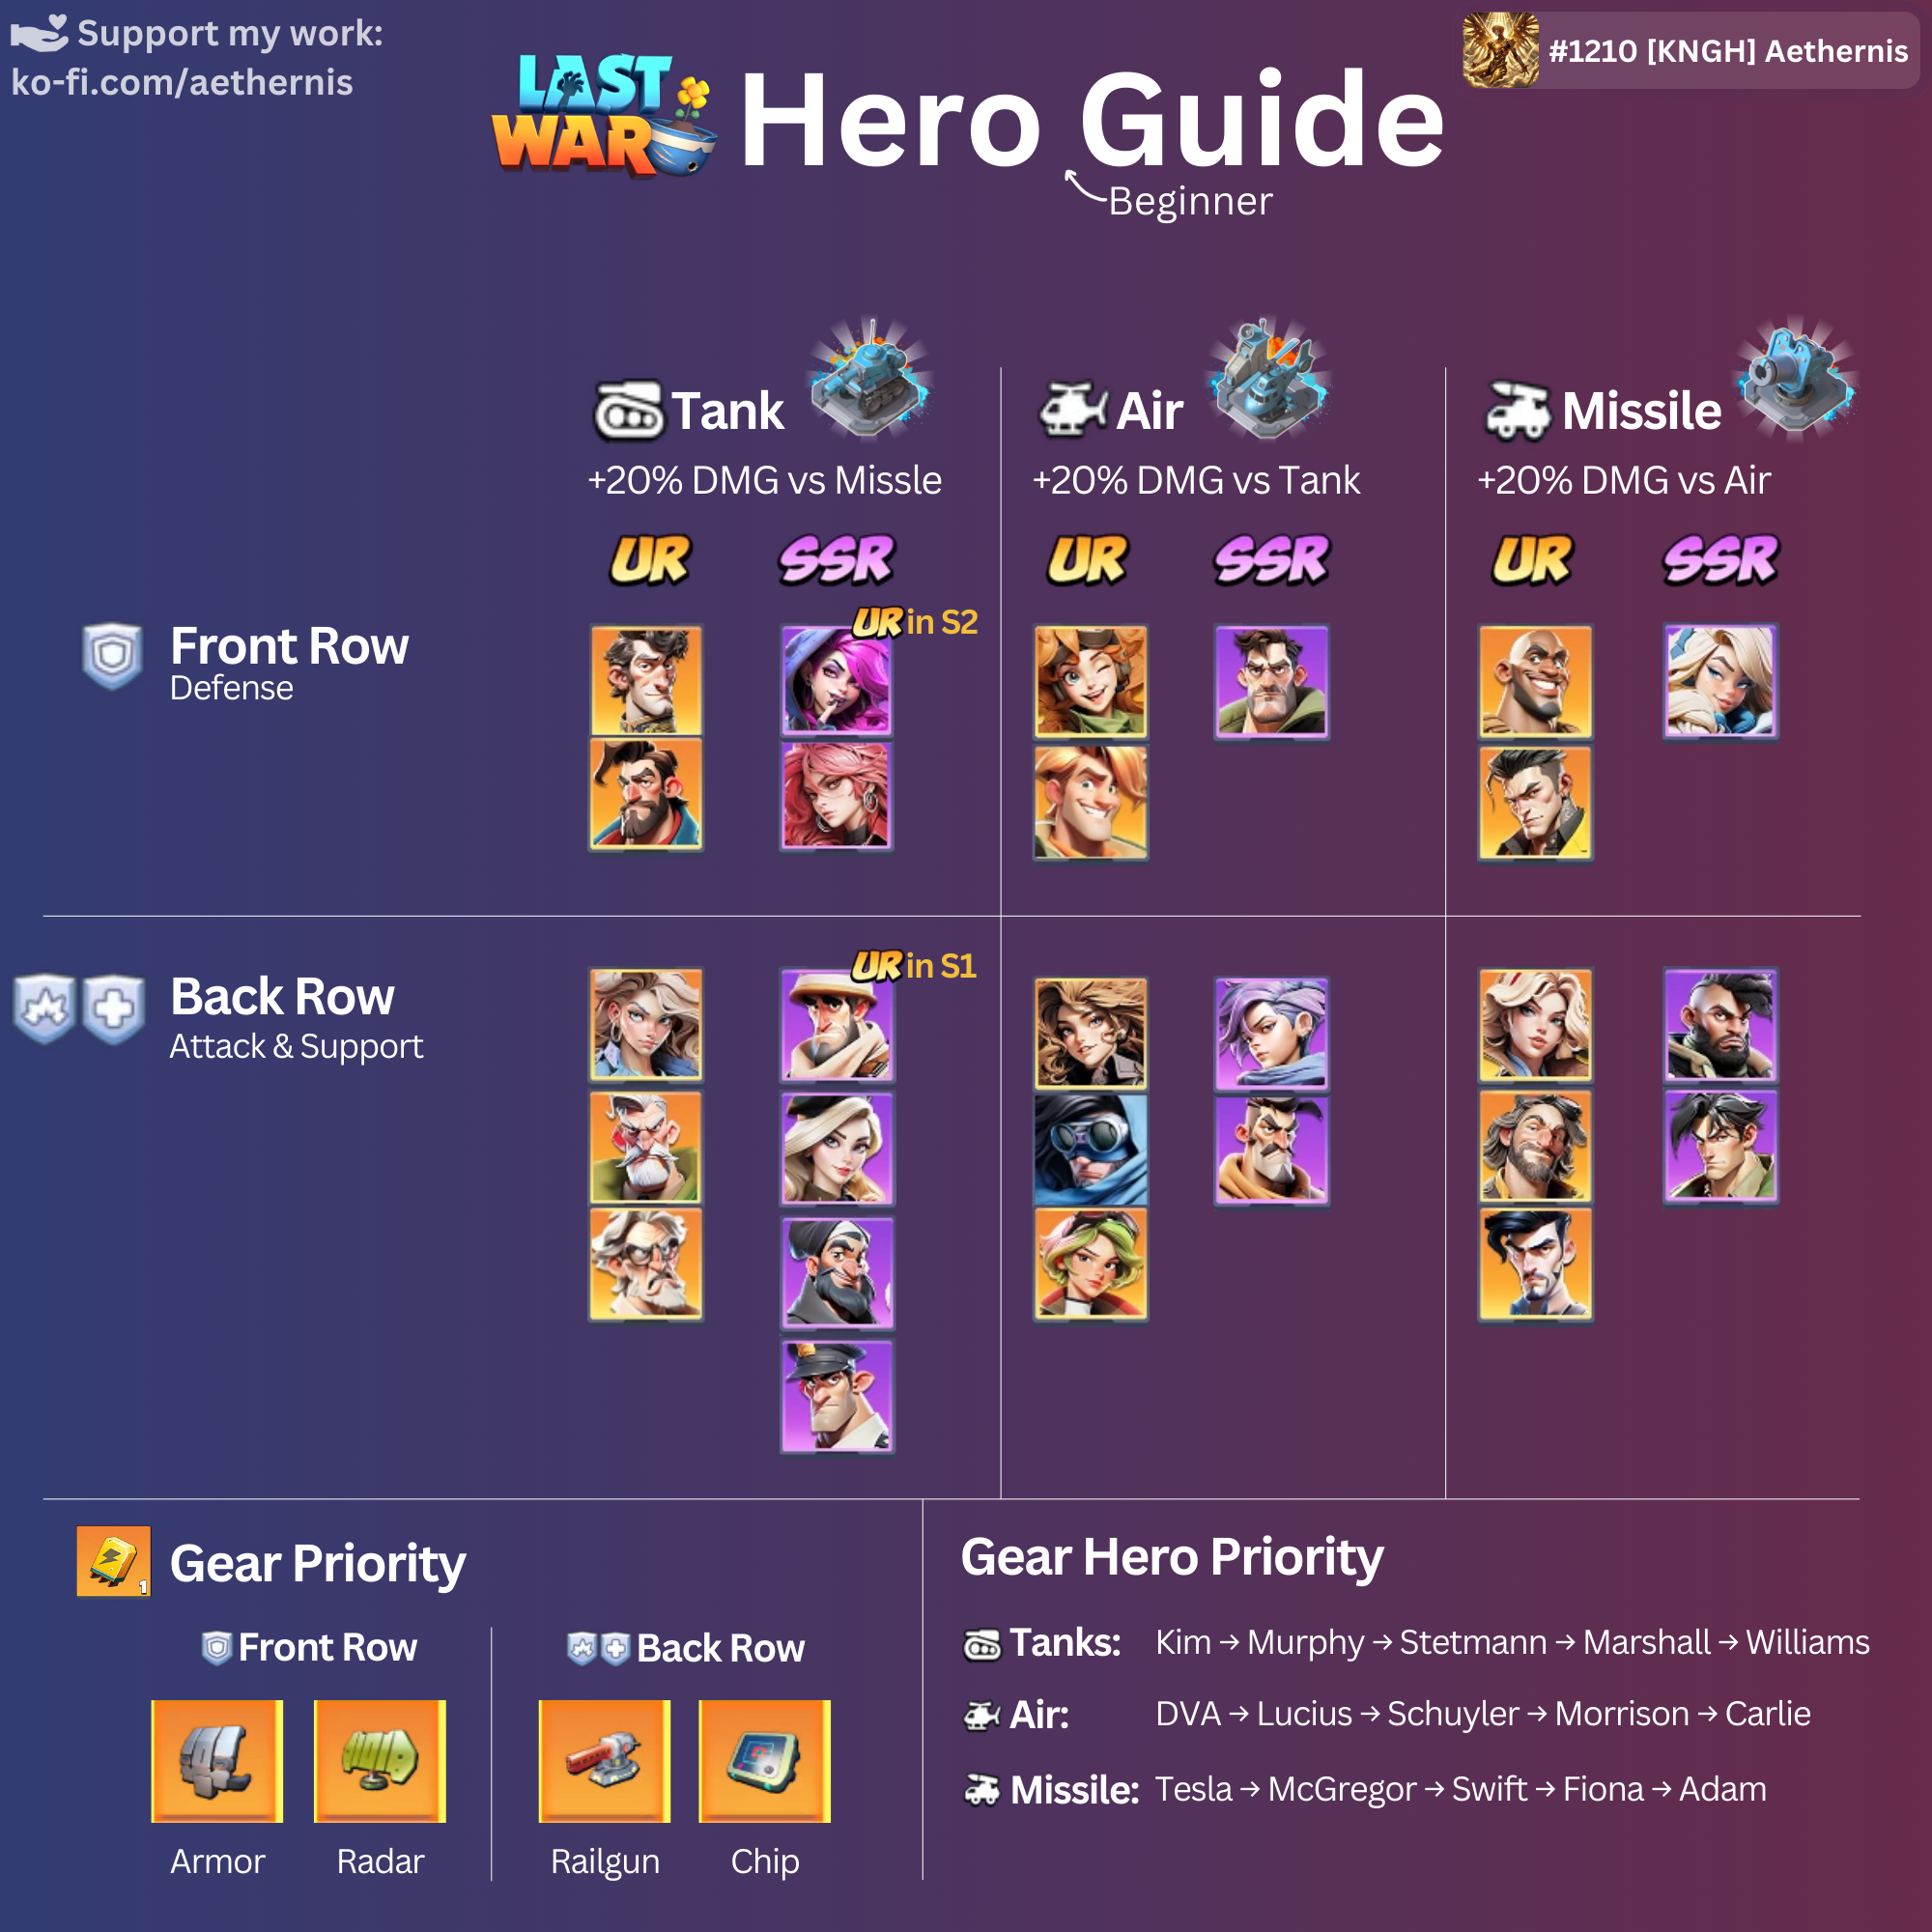
Heroes
It’s often tough to figure out which heroes are worth upgrading. Usually, you don’t have enough Hero XP to keep everything maxed. As a general rule, SR heroes are not useful and should only be used situationally (e.g., if you want to bring fewer squads to Alliance Exercise). Some SSR heroes are good for free-to-play players, but can’t compete with paid UR heroes. The classic trifecta is also true for Last War. There are tank, DPS, and support heros. Most teams are 2x Tanks and 3x DPS with support depending on the hero and situation. See below for which heroes to focus on.
You should first build ONE strong team. For F2P players, Tank heroes are the best option, since you can get Murphy and Kimberly early and relatively cheap. There are also good alternatives among SSR like Mason, Violet, Scarlett, and Fiona. You can skip Aircraft or Missile teams unless you want to spend money.
Paying players can build 3-4 very strong teams. Many focus on a Aircraft team, since it gets bonuses against the commonly used Tanks (see squads).
Tier List Links
Here are some resources on which heroes are best and why:
- https://www.allclash.com/tier-list-of-best-heroes-in-last-war-survival/
- https://www.pocketgamer.com/last-war-survival/tier-list/
- https://www.mrguider.org/articles/last-war-survival-best-hero-tier-list/
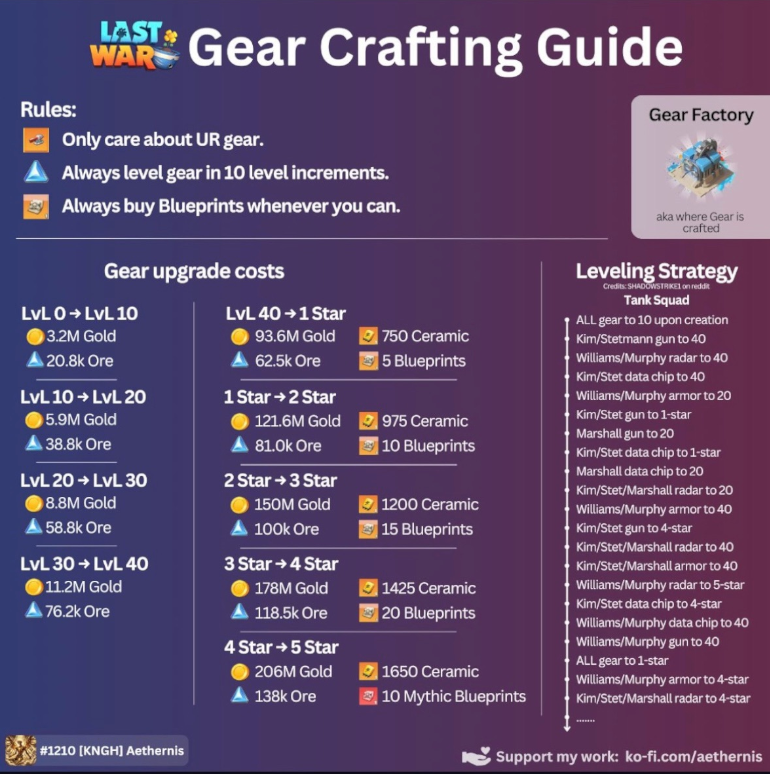
Gear
For gear, focus only on UR Gear, which can be produced in the Gear Factory. Get the factory to level 10 quickly and start producing gear. Equip a team with SSR Gear if needed and dismantle the rest to get as much Ceramic as possible. Don’t waste Upgrade Ore
 on SSR Gear—it’s not worth it.
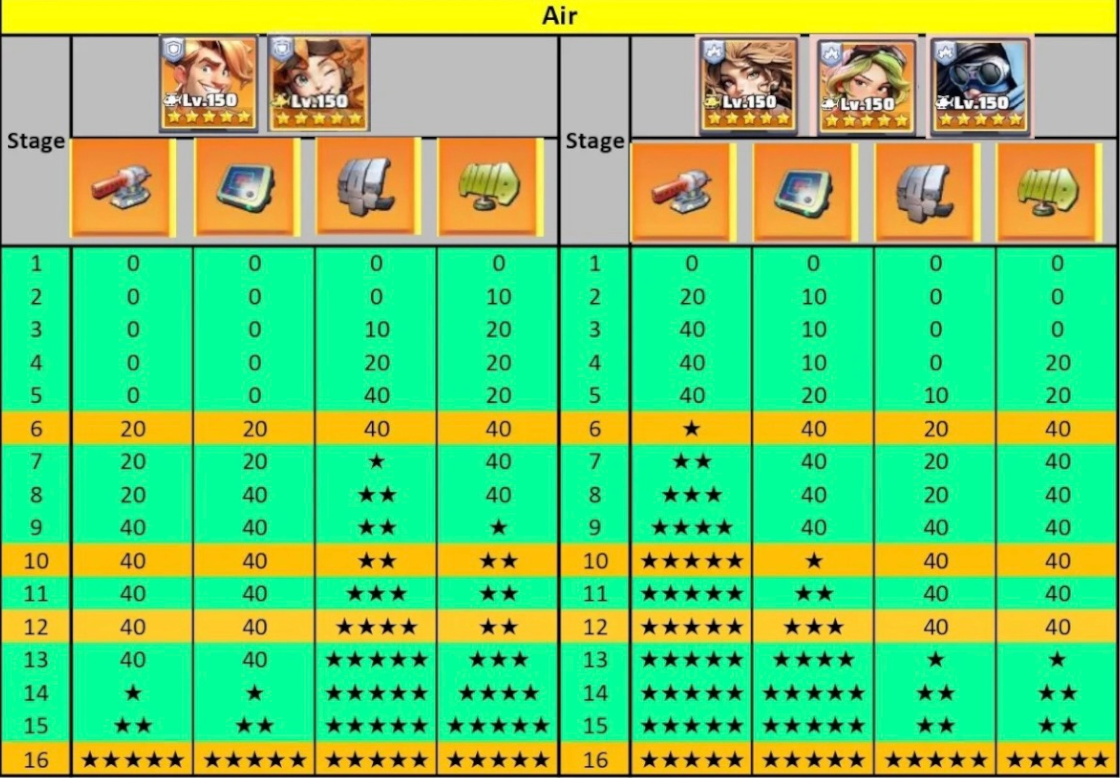
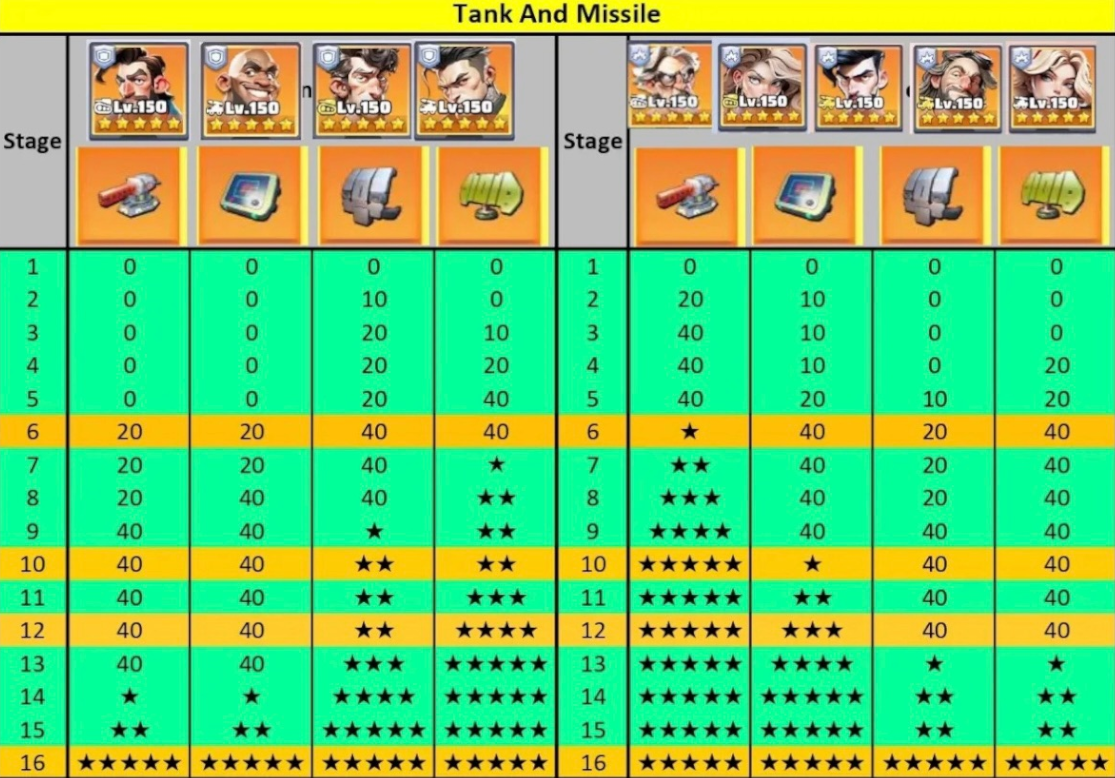
Upgrade gear in steps of ten, since every 10th level unlocks new bonuses.
Depending on the hero (front row, back row), not all gear should be upgraded equally. DPS need more punch, while Tanks in front focus on survival. So, prioritize Weapon and Chip in the front row, while Armor and Radar get more levels in the back. See the diagrams below for setups for individual heroes. The same logic applies to SSR heroes. The nice thing about gear is you can swap it around anytime.
Squads
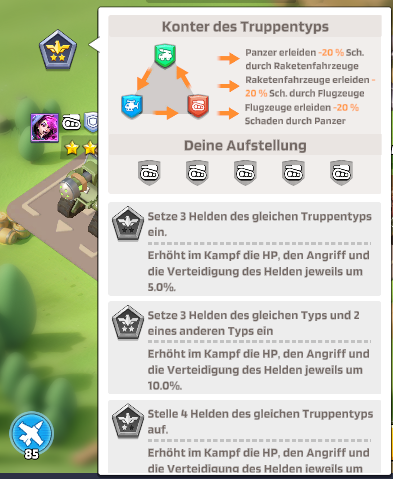 Certain squad setups give bonuses. Hero types counter each other in a rock-paper-scissors format: Tanks get bonuses against Missiles, Missiles against Aircraft, and Aircraft against Tanks. There are also HP/Attack/Defense bonuses for these setups:
- 3/1/1: 5%
- 3/2/0: 10%
- 4/1/0: 15%
- 5/0/0: 20%
A team of five Tank heroes (or five of any type) gets a 20% bonus. A mix of three Planes, one Missile, and one Tank only gets 5%.
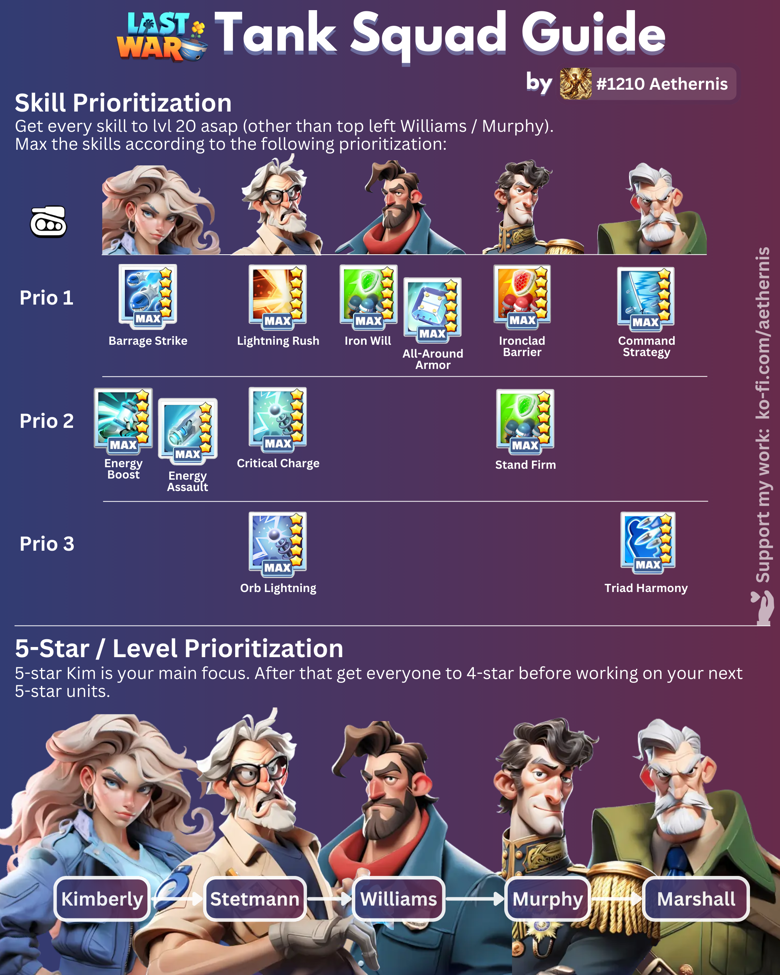
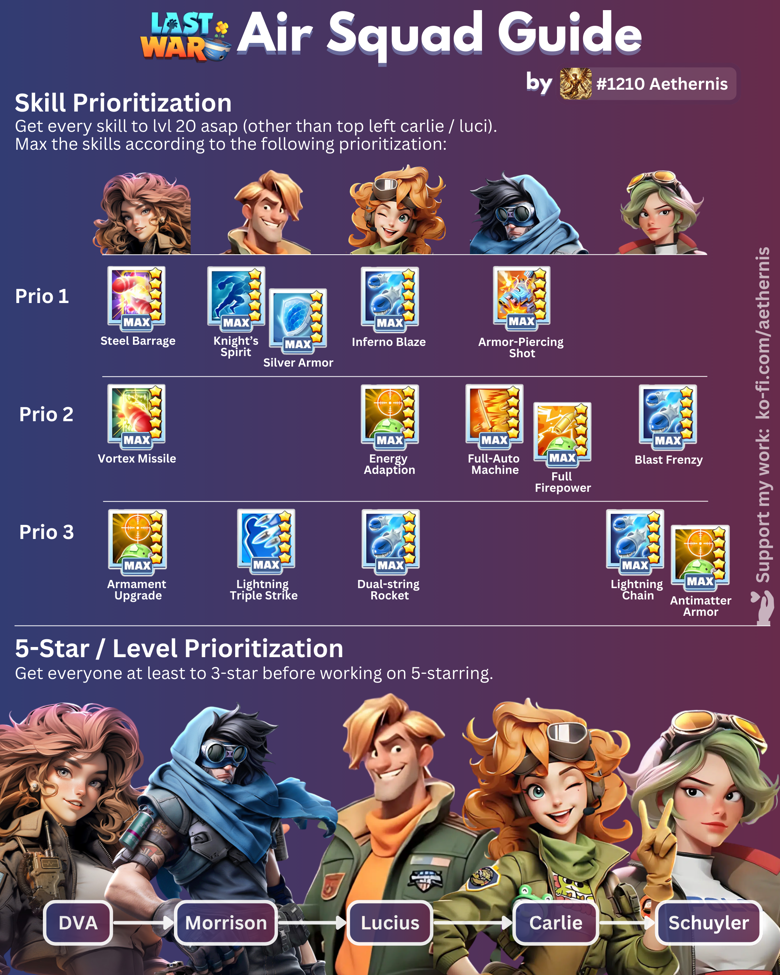
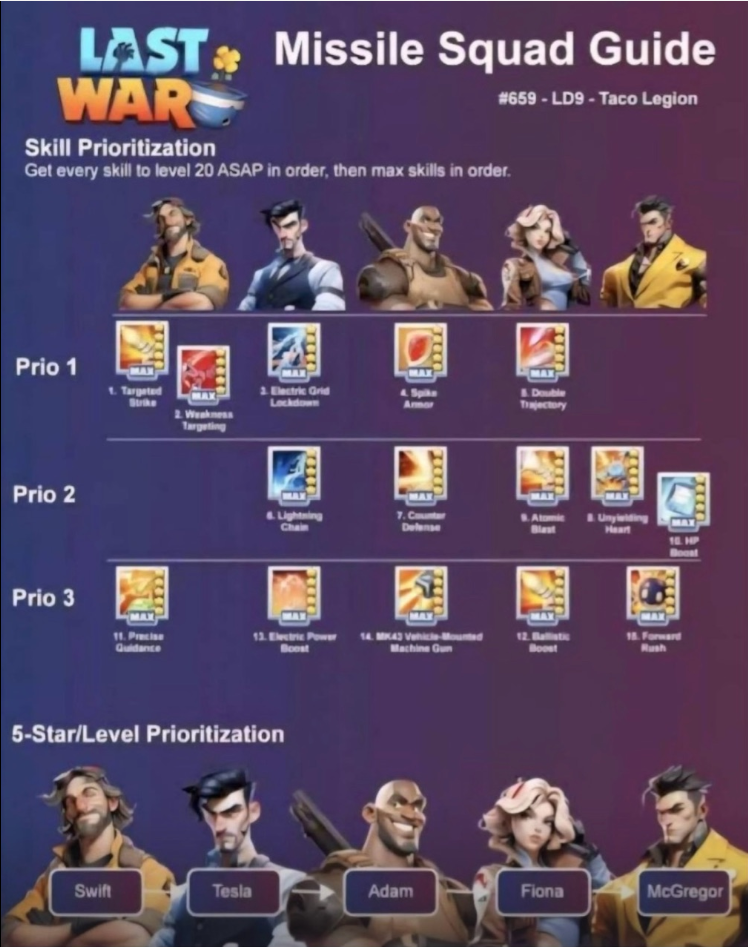
Skills and Stars
Skill Medals run out quickly, as do Hero Shards
 and Universal Shards
 . So you need to focus on particular skills and heroes to get the most out of your squads. The diagrams below show a good path. Note that it also depends on where you can get free hero-specific shards. You might level Murphy before Williams, since Murphy generates more shards from recruitment. Universal Shards should always follow the recommended order!
Wall of Honor
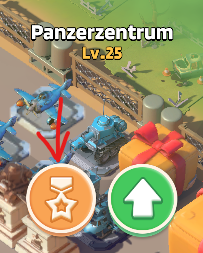 When heroes reach five stars, they’re added to the Wall of Honor. You can access this for each hero type via the Tank Center, Aircraft Center, and Missile Center. There, you can spend extra Hero Shards for additional upgrades.
Note: Universal Shards should usually be used to get other heroes to  . Only spend shards on the Wall of Honor if you have extras you can’t use elsewhere.
Overlord
 In the offseason after Season 2, the Overlord is unlocked on day 89. This is a special Gorilla that supports a team as a sixth hero, has its own abilities, and needs to be leveled separately. However, it takes several weeks before you can actually use the Gorilla in a team.
Unlocking
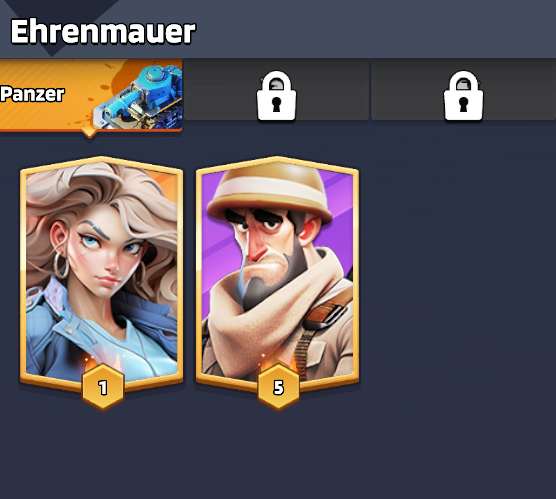
 To activate the Overlord feature, you first need to complete a special radar task that appears independently of the other missions. After this "rescue" of the baby, you can build a new building in your base where the injured Gorilla needs to be nursed back to health.
This also happens through radar tasks that provide water, food, and medicine for the injured Gorilla. Additionally, you can acquire the first  Training Certificates and
  Training Guidebooks through daily tasks.
It'll take weeks or even months before free-2-play players can finally assign the Gorilla to a team. In the medium term, your best chance is the Bounty Hunter event to buy enough Training Certificates to make noticeable progress.
After that, you can orient yourself using this inforgraphic:

HPI's Basic Training
 Your heroes are now well equipped for battle. In TKSL Basic Training, we pass on the tips and tricks that help you survive in fights against other players. The first and most important lesson is simple: practice matters. Test yourself on PvP Saturdays, join Desert Storm and Winter Storm regularly, and build real PvP experience.
Most people did not install this game for PvP. Like most players, I originally just wanted to walk through gates and play a casual base builder. No one tells you up front that you are stepping into a fairly hardcore PvP game. But now that you are here, you might as well learn how to fight properly.
The first steps are usually the hardest. A simple way to start is by burning random small targets on the world map, then picking off isolated VS opponents again and again. Even if they have no squads on the wall, they still give VS points as long as units remain. That is how you learn. PvP is fun, and it is one of the key reasons our alliance keeps winning VS weeks, so this section is here to get more of you onto the side that does the burning.
What Does PvP Actually Mean?
 Player versus Player means you burn other players' bases. From the victim's point of view: they log in and their squad slots are empty. The extra benefit is that on Saturday you generate VS points for the alliance with very little setup. Unlike many other scoring methods, you are not dependent on speedups, and you can still reach your own boxes while contributing much more to the alliance win.
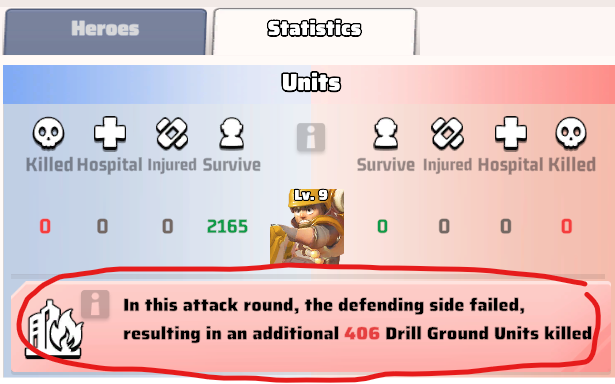
To actually score points or deal real damage, units must die. The easiest indicator is the number that appears above the defender's base during an attack. That number shows how many enemy units were killed. Even if the defender has no squads on the wall, units on the Drill Ground can still be hit. You can only confirm that in the battle report. In the Stats tab, there will be a note showing how many units were killed on the Drill Ground.
If the enemy has neither squads on the wall nor units on the Drill Ground, you can usually save your Stamina . Those attacks do no meaningful damage.
This is just as important on defense. Even with no squads on the wall, every attack still kills some units on the Drill Ground. If your base gets fully burned multiple times, you can absolutely lose all of your units.
Using Shields
 Anyone who is not actively fighting should use a shield on PvP Saturdays. You can buy shields either with Alliance Points
 in the Alliance Shop or directly for Diamonds
 by clicking your base. You can also refresh a shield before the current one expires. In that case, the timer restarts based on the new shield duration. If you do not want to fight at all, or only want to support from behind a shield, the safest option is to put up a 24-hour shield sometime on Friday and refresh it during Saturday. That carries the least risk.
Trying to save Alliance Points by timing shields too tightly is how people get burned. Even five minutes without a shield is enough to get completely wrecked.
Also keep your gatherers at home. Otherwise they can be bombed off resource tiles as well. As a rule of thumb, all squads should be removed from the wall.
Teleporters
 The single most important tool in active PvP is the teleporter. You need to understand how each type works if you want to escape stronger opponents consistently.
As a rule, if the free VS Teleport is not available, all squads must stay in your base. Otherwise, you are completely exposed to attacks.
VS Teleport
The free VS Teleport is by far the strongest teleport in the game. On Saturday, it lets you teleport to the VS opponent for free. Depending on the outcome of the Warzone Duel, attackers may also be able to teleport into defending warzones. The teleport is not just free, it also does not require you to recall your squads first. After teleporting, all squads are immediately ready again. Every other teleporter requires all squads to be back at base.
That is why it has a five-minute cooldown. The timer starts as soon as you teleport into another warzone. You can always teleport back for free the same way, but if you want to go again you have to wait for the shared cooldown unless it has already expired. You can also go to the relevant warzone manually, for example via Favorites, and click an empty tile. If the VS Teleport is available for that warzone, the teleport is still free. All free teleports into other warzones share the same five-minute cooldown:
- VS Teleport: In the VS menu, open the
Alliance Assaultstab and clickAttack. - Warzone Duel Capitol Battle: In the Warzone Duel menu under the
Capitol Battletab, attackers can teleport to the defending warzone. - Warzone Grouping: In the Warzone Duel menu, click
Groupingat the bottom to teleport to all defending warzones. This works regardless of the result of your own duel. - During the Meteorite Iron War, you can teleport to the warzone where the event is taking place during both event windows.
Alliance Teleporter
 The Alliance Teleporter can be used inside your own warzone to jump to the alliance rally point. That means it only works in your alliance's home warzone. You should also only use it if your R4s regularly move the rally point on battle days. Otherwise enemies can find that point and attack it. Never teleport into the alliance's central Capitol area. That is the first place enemies will look, and it makes you an easy target. Only return to the positioning once you have an active shield again.
Random Teleporter
 At first glance, the Random Teleporter does not seem very useful because it drops you somewhere random inside the current warzone. In practice, it is still useful when you need to disappear quickly and create some breathing room. Like the Alliance Teleporter, it is also fairly cheap.
Advanced Teleporter
 The Advanced Teleporter is the most expensive option, but unlike the Random and Alliance Teleporters it is effectively always available for 1500. Click any free tile on the map and use it to teleport there directly. That makes it the most flexible teleporter overall, and it is also what you use to join the alliance positioning.
There is one restriction: if a warzone could theoretically be reached with the VS Teleport, the Advanced Teleporter will not work there. In that case, you must wait for the VS Teleport cooldown. Once you are already inside a foreign warzone, though, you can use the Advanced Teleporter freely within that warzone.
Offense
- Expect to fail sometimes War and PvP always involve losses. But what do you actually lose here? Units, yes. Some resources, sure. Fun, ideally not. Do not be afraid of getting hit once in a while. That is part of the process. You can reduce the damage if you understand the systems explained here. And realistically, that is what Monday to Friday is for anyway: you build units so you can use them.
- Take squads off the wall
- This matters in case the enemy fights back. If a stronger player wipes your wall squads, your PvP day is effectively over very quickly because you will be left with too few soldiers.
- It also means that getting attacked yourself is far less punishing. You do not need to defend. You lose some resources and a limited number of units, roughly around 500 per hit. That is still much better than leaving squads on the wall, where losses can quickly climb into the thousands.
- Find a safe spot on your own server
- This is where you keep jumping back to after an attack or when you need to run. It becomes your staging area for the next strike.
- It should be hidden. An empty city works well. A base placed near the middle with a free row above the mud is hard to spot when people scroll over the map at high zoom.
 Save that safe spot under the green friendship markers in the search menu so you can access it instantly. You will notice very quickly why this matters.
- You can use Random or Alliance Teleporters too, but those cost Alliance Points or Diamonds. The VS Teleport to the enemy server is free and only has a five-minute cooldown.
- Get comfortable with the clicks needed to escape fast When you are out attacking, sooner or later someone will attack you back. In that moment, the simplest solution is usually to run, and that is strongly recommended. Practice the clicks needed to reach the search menu and your saved marker, or your inventory if you need a teleporter item. This needs to work even when things get hectic. Speed is the key.
- Find a target
- Your target should not be too strong, should still have units left, and should be easy enough to burn. You learn this mainly by trying.
- Check the target's power by clicking the base. Compare it with your own power and also look at their kill count. Both numbers tell you a lot. Total power includes buildings and squads.
- Example: if you have 120M power with a full Drill Ground and the target has 110M power plus only 200k kills, there is a decent chance you can break through.
- That target might have a full Drill Ground and only reach 110M, or they might have an almost empty Drill Ground and still sit at 110M. The second case is much harder. Low kills often point to a weaker or less active account, though, so it can still be worth attacking. They may also have units that are not on the wall.
- When starting out, it is safest to hit bases that are one or two HQ levels below yours. Failure is much less likely there.
- It sounds odd, but after a while you develop a feel for whether a target is worth it. You will still be wrong sometimes.
- Refill Stamina It is miserable to run out of Stamina
- Optional: bring a strong shielded buddy If possible, bring a stronger alliance mate with a shield who can come along and defend you.
- The jump and the fight
- Teleport to the target as close as possible.
- Attack with Squad 1. Do not wave all squads into the base at once, especially if there are still squads on the wall.
- If possible, do not wait for the squad to return home before attacking again.
- Once the target is done, open your marker menu or magnifier and jump back to your safe spot. Stay alert anyway. No location is 100% safe.
- If that worked cleanly, that was the ideal case.
- If someone attacks you while you are attacking, go back to point 4 and run.
- Repeat from point 5
- Shield up After every aggressive action, meaning scouting or attacking, you cannot use a shield for at least 15 minutes. That means you need to hide from the enemy during that window. Keep enough teleporters on hand so you can relocate if needed. Put your base somewhere remote, wait out the cooldown, then shield and use the free teleport to return to the hive.
in the middle of an attack chain. Make sure you have enough available before you go. Depending on your Engineer profession skill, each base can cost around 30-50 . Again Without the Chatter
- Take squads off the wall
- Have a safe spot ready
- Find a target
- Refill Stamina
- Speed matters
- Jump close to the target
- Open fire
- Repeat
- Done? Shield up
Defense
Reinforcing Other Bases
If allies lose their shield, reinforcing them usually does not make sense. The reason is simple: enemies normally scout bases first and only attack if they believe they can beat the reinforcements. In that situation, you are mostly just feeding them extra VS points. Even if several reinforcements stop the attacker, there is still a good chance the attacker comes out ahead on points because they killed far more units than they lost.
If you do reinforce someone anyway, you need to stay alert the entire time and watch exactly which enemies show up and whether they can beat your reinforcement. If they can, pull your squads out immediately.
Hiding Units
If you have fewer units left than your squads can carry, you can hide those units by sending your squads on long marches. If that leaves no units on the Drill Ground, you can even let your base burn without major consequences other than some looted resources. The important part is being consistent about keeping your squads outside the base. Either send them to a distant resource tile or reinforce an ally who already has a shield. In both cases, the units cannot be attacked there. Just make sure your ally's shield does not drop unexpectedly.